Neurorehabilitation for hand paralysis
tailored to suit individual patients' needs
MELTz is a device for neurorehabilitation in patients with hand paralysis. It provides stable and continuous neuroscience-based support, helping patients relearn how to move their hands. Modes and menus tailored to symptoms provide effective hand rehabilitation.
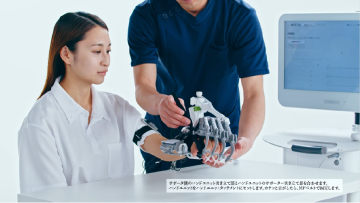
MELTz consists of a main unit with a monitor, a supporter and unit worn on the hand, and an EMG cable for measuring muscle potentials. The therapist attaches the EMG cables, electrodes, the supporter, and hand unit to the patient, and patient sits in a chair during the training. The hand unit can be attached to either the left or right hand by replacing the thumb unit. The main unit is started once usage preparation is complete.
The therapist operates the main unit. The patient wears the training equipment, including the hand unit, supporter, and EMG cable.
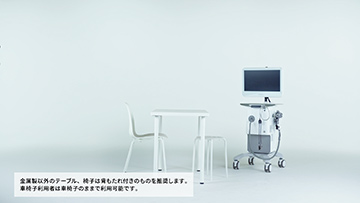
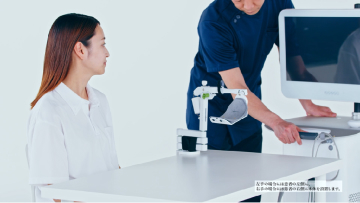
Training requires a table to hold the upper limb support device in place and a chair for the patient. To train the left hand, place the device on the left side; to train the right hand, place the device on the right side.
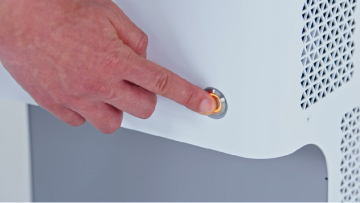
Attach the EMG cable to the electrode and set the hand unit according to the hand to be attached.Turn on the main unit, start the system, and initialize the equipment. During initialization, adjust the thumb unit's orientation so that the fingers do not hit each other, and press the [▶] button on the initialization screen.
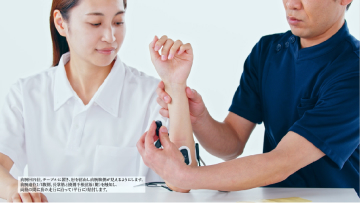
Set up the equipment to be worn by the patient. The EMG cable band is secured to the patient's upper arm. After attaching the reference electrode, the three electrodes are applied to the arm. The dedicated supporter and hand unit are fitted and adjusted to suit the distance between the fingers and the length of each finger.
Wrap the EMG cable band around the patient’s upper arm to secure it. After attaching the reference electrode (GND/RLD) to the patient’s elbow, attach electrode Ch1 to the extensor digitorum muscle, electrode Ch2 to the flexor digitorum profundus muscle, and then attach electrode Ch3 to the flexor digitorum superficialis muscle.
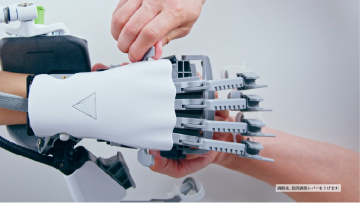
With the supporter’s hand unit attachment facing the back of the hand, pass the hand through the supporter, and then tighten the hook and loop fastener strap. The hand unit is worn over the supporter and secured with the MP belt.
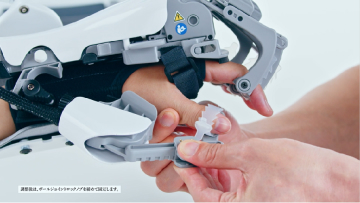
Adjust finger spacing by raising the finger spacing adjustment lock lever. The hand unit’s finger size is adjusted to the length of each finger, and the DIP joint is secured with the DIP belt.
Attach the thumb unit to the thumb. Adjust the position of the thumb joints in accordance with the training to be performed.
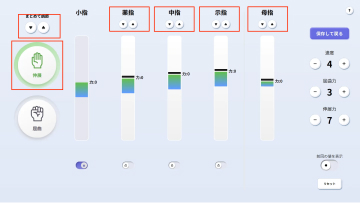
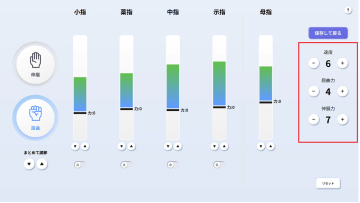
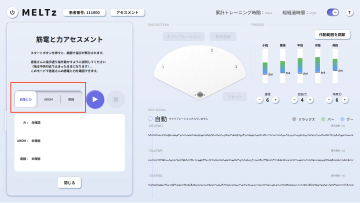
The range of movement is adjusted on the main unit. Extension mode is used to configure the extension movement range of the thumb and fingers. Flexion mode adjusts the movement range of the flexion side of the fingers. Speed, flexion forces, and extension forces can be adjusted, and the movement range settings can be saved. Three assessment menus are available when performing assessments: Electromyography and force, AROM, and Spasticity.
[Press the "Adjust Range of Movement" button and select extension or flexion to adjust the range of movement for each finger. Press the [▲] (extension side movement) and [▼] (flexion side movement) buttons to adjust the range of movement for extension of the thumb and fingers. The four fingers can also be adjusted together.
There are 10 adjustment levels for speed, flexion force, and extension force. Speed adjusts the device's operating speed, while flexion force and extension force adjust the motor output in these respective directions.
To run the assessment (Optional), press [Run] under “Assessment”. Electromyography and force, AROM, and spasticity will be measured.
Start the training. Select a mode of training to be performed: passive, active instruction, and active-free. In all modes, the instruction style, exercise pattern, and the number of repetitions are configured before training begins.
Passive mode
Operates without myoelectricity.
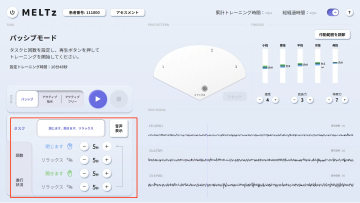
Press [Task], [Times], and [Progress] in the lower left training box to configure the exercise pattern. The Task tab configures the amount of time each position is held. The Times tab configures the number of movements, the number of sets, and the rest time between sets. Finally, the Progress tab is used to turn audio on/off and configure relax movements.
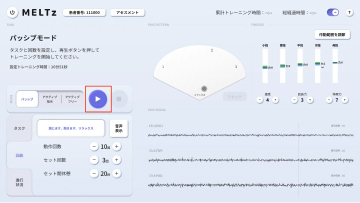
Press the [▶︎]Button to start training.
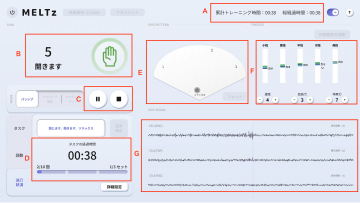
A: Shows Training Time and Total Time.
B: Shows movement instructions and countdown.
C: Pause and Stop buttons.
D: Shows the time elapsed for the current task. Displays the progress status bar.
E: Shows the configured range of movement.
Active Instruction Mode
Controls patient movement using myoelectricity
and performs training in accordance with the configured instructions.
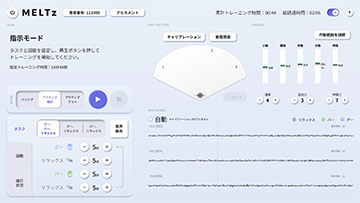
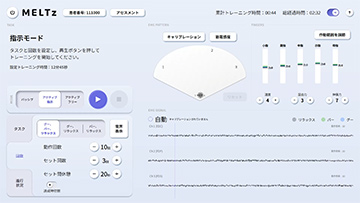
Press [Task], [Times], and [Progress] in the lower left training box to configure the exercise pattern. The Tasks tab is used to configure the three exercise patterns “Make fist, extend fingers, relax,” “Make fist, relax,” and “Extend fingers, relax,” as well as the duration. The Counts tab is used to configure the number of movements, sets, and rests between sets. Finally, the “Progress” tab is used to turn audio on/off and limited mode on/off.
Pressing the [▶︎] button starts automatic calibration. The device identifies when an exercise (attempt) is performed in accordance with the instructions. The equipment assists with the exercise (attempt) during training.
Note: Calibration can also be configured manually.
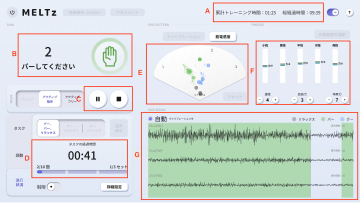
A: Shows Training Time and Total Time.
B: Shows movement instructions and countdown.
C: Pause and Stop buttons.
D: Shows the time elapsed for the current task. Displays the progress status bar. Displays how many movements have been configured and the progress of the number of sets.
E: Shows the configured range of movement.
F: Represents identified myoelectric patterns as graph positions and colors.
G: Displays muscle shape and identification status (as colors).
Active Free Mode
Controls patient movement using myoelectricity
but allows patients to perform the exercise at their own pace.
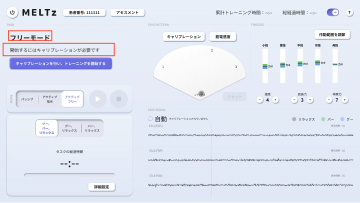
When the task display box displays “Calibration is required to start” press the [Calibrate and Commence Training] button. Have the patient perform the exercises in accordance with the instructions to calibrate.
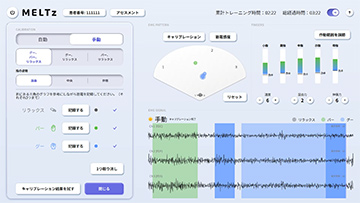
If the automatic calibration fails to recognize the myoelectricity, manual calibration is required. Stop the device and press the Calibration button located in the EMG pattern box, then select Manual from the Calibration Mode box on the left.
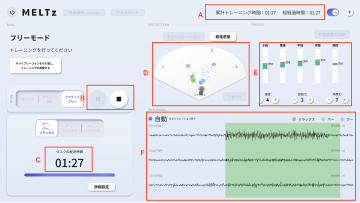
A: Shows Training Time and Total Time.
B: Pause and Stop buttons.
C: Shows the time elapsed for the current task. Displays the progress status bar. Displays how many movements have been configured and the progress of the number of sets.
D: Shows the configured range of movement.
E: Represents identified myoelectric patterns as graph positions and colors.
F: Displays muscle shape and identification status (as colors).
Paralysis and motor dysfunction after stroke result from damage to areas of the brain involved in movement. Therefore, recovery of motor function requires rebuilding damaged brain function and having the cerebral nervous system relearn how to move.
Neurorehabilitation is a new method of rehabilitation based on neuroscience, where patients relearn motor functions through restructuring neural pathways in the cerebrum.
MELTz uses an AI based on proprietary algorithms to comprehensively analyze the electrical signals in the patient's forearm. As a result, it provides more opportunities for rehabilitation by recognizing the hand movement that the patient is trying to perform and accurately reproducing the same movement repeatedly using robotic assistance. Providing movement assistance in conjunction with motor intent encourages the cerebral nervous system to relearn these movements.
MELTz is composed of core technologies from MELTIN, a start-up company operating in the field of cyborg development.. The company's technologies provide highly sensitive bio-signal measurements, biomimetic robotics, and analysis using AI equipped with proprietary algorithms. For example, myoelectric data are measured with high sensitivity, then instantly analyzed by the AI to recognize the wearer's intent and translate it into robotic movements in real-time, providing assistance and feedback for movement and motion.
MELTz is designed to be a safe, easy-to-use, and user-friendly device from the perspectives of product design, UI design, and UX design. The user experience of MELTz is intended to eliminate anxiety through size customization and an easy-to-understand visual interface. In addition, the system is designed to be used repeatedly without causing strain.
Generic name
Active extension / bending and stretching rotation exercise equipment
Commercial name
MELTz Hand Rehabilitation System
Classification
Controlled medical devices / Controlled medical devices requiring special maintenance
Medical device
certification no.
304AIBZX00014000
Attached documents
Power source
Voltage
AC 100 V
Frequency
50 / 60 Hz
Power
Max. 200 VA
Size
W 540 x D 735 x H 1290 mm
Weight
Approx. 50 kg
Operaing mode
Continuous
Electric shock protection
Class I device / BF-type applied parts
Usage environment
Temperature
5~35℃
Humidity
10~90%RH
Atomospheric pressure
800~1060hPa
Storage environment
Temperature
-20~60℃
Humidity
10~90%RH
Atomospheric pressure
800~1060hPa
Electrical safety standards
JIS T 0601-1:2017, JIS T 0601-1-2:2012
For patients displaying weak myoelectricity training is possible using the passive mode or the active instruction mode (limited mode), etc.
MELTz business transfer
MELTz business was acquired by FrontAct, 100% subsidiary of Sumitomo Pharma Co., Ltd.. Please see the product page in FrontAct's HP.